UZI Maintenance
|
|
UZI Maintenance |
Keep Your UZI Running
by
David Gaboury
The UZI is known as a tough, tireless workhorse that never
fails. While there’s a lot of truth to that, it needs good care like any other
firearm. Out of spec parts or poor maintenance can put your afternoon of fun on
hold quickly. Here are some suggestions to consider the next time your workhorse
stumbles. Most of these suggestions apply to fully automatic or semiautomatic
UZIs but you’ll find that replacement parts for the semiautomatic are harder to
find and more expensive so there’s an incentive to repair rather than replace in
that case. The three most common problems you’ll run into are failure to fire,
failure to eject and failure to feed.
Failure to Fire
 |
| The UZI bolt face, showing unused firing pin (A) and the extractor claw (B) in the proper position. Note that the extractor rests on the raised rim just below the claw. |
A failure to fire occurs when the round is fed into the
chamber but the primer doesn’t detonate. Usually the round will have a light
primer strike on it. There are three
possible causes for this. First, the open bolt firing pin, which is a small
projection milled into the bolt face, may be worn or broken. This is an uncommon
cause but if it happens, the firing pin will need to be welded up or the bolt
replaced. Surplus bolts are cheap and plentiful so replacement is usually the
easiest option. The firing pin on the semiautomatic UZI is pinned to the carrier
and can also be replaced if worn.
Another cause is excess headspace. If the round doesn’t
seat firmly in the chamber, the bolt will push the round forward rather than
detonate the primer. Excess headspace can be caused by an out of spec chamber
but that’s uncommon. A more likely cause is a loose barrel nut. This simple to
diagnose, simple to fix problem can easily go unnoticed. With the barrel nut
tightened you should not feel any play in the barrel. If the problem is chronic,
it might be due to the barrel nut catch being worn or the teeth on the barrel
nut being broken off. Either part can be easily replaced. Remember to depress
the barrel nut catch when tightening the barrel nut to reduce wear on both
parts. If the problem persists, an easy cure is to put a rubber or copper gasket
between the barrel flange and the barrel nut. Another rare cause of excess
headspace is broken trunion welds. If the welds that hold the trunion inside the
receiver fail, the trunion will slide forward when firing the gun. Rewelding the
trunion should be done by a qualified gunsmith.
The final cause of failure to fire occurs when the bolt
moves forward so slowly that it doesn’t hit the primer hard enough to detonate
it. This is actually a type of failure to feed and will be discussed later in
the article.
 |
| Broken teeth on the barrel nut will allow the nut to loosen when the gun is fired. |
 |
| If you can hear the clicks while tightening the barrel nut, then you are wearing out the front edge of the barrel nut catch. To avoid the problem, the barrel nut catch should be held down until the nut is tight. The catch on the left shows wear but the front edge is still square so it’s serviceable. |
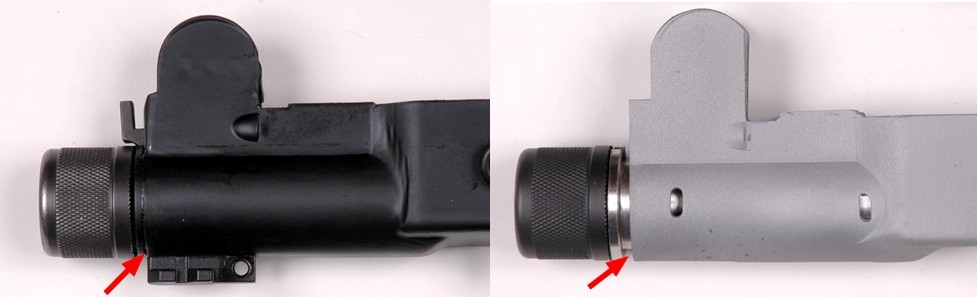 |
| The barrel trunion is welded to the receiver in two spots on each side. If the welds break, the trunion can slide forward as depicted in the right photo. The left photo shows the proper position of the trunion up against the front of the receiver. |
Failure to Eject
 |
|
The point of the ejector (A) faces forward and strikes the base of the cartridge as the bolt recoils. The rivet head (B) can be seen to the side of the ejector. |
Failure to eject is also known as stovepiping. The first
possible cause of failure to eject is weak ammo. The heavy bolt and recoil
spring of an UZI require a heavier impulse to operate than a typical 9mm pistol.
UMC and Remington green box ammo are notoriously weak and can cause failures to
eject. If the empty cases are not ejected several feet from the gun, try
different ammo.
If ammo isn’t the problem, take a look at the ejector. It
should be level, tight and pointing straight forward. It’s riveted to the bottom
of the receiver and if it gets loose it won’t firmly strike the back of the
fired case as the bolt recoils reward. To tighten a loose ejector, remove the
grip frame from the gun, exposing the bottom of the rivet. With the top cover
and bolt removed, turn the gun over and rest the head of the rivet on a support,
then hammer the bottom of the rivet until the ejector is tight. Once it’s tight,
install the bolt without the recoil spring and push the bolt forward and
backward by hand. It should pass over the ejector without hitting it. Performing
this check with the barrel and stock removed will give you a better view of the
ejector clearance.
 |
| To secure a loose ejector, turn the receiver upside down and support the rivet head. A bolt held in a vise makes a suitable support. Use a punch and hammer to peen the bottom of the rivet until the ejector is tight. |
If ejection problems persist, it’s time to check the
extractor, which is the leading cause of failures to eject. The extractor must
firmly grip the case as the empty round strikes the ejector in order to generate
the energy needed to flip the case out of the gun. Remove and clean the
extractor, particularly under the claw. Residue buildup under the extractor claw
will prevent it from firmly gripping the case rim. Also clean the bolt hole that
the extractor sits in. A .22 caliber cleaning swab works nicely for this.
Residue in the hole will prevent the extractor from flexing properly. Before
reassembling, be sure that you have the correct extractor in the gun. 9mm
extractors are unmarked while the .45ACP extractors are stamped “45” near the
back. They are not interchangeable. For best results it’s also best not to mix
up semiautomatic and fully automatic extractors.
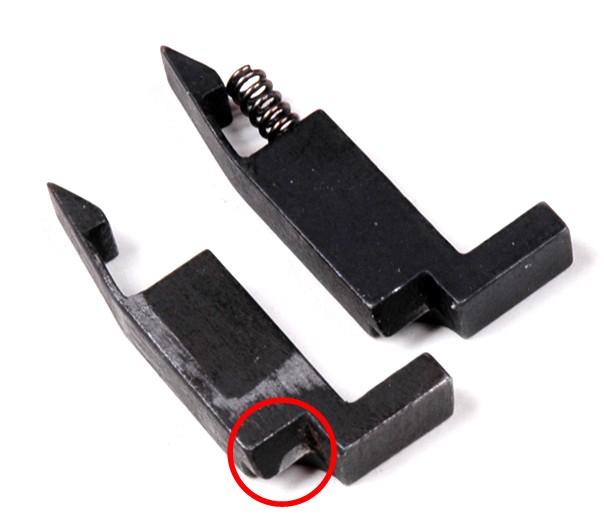
The lower point of the extractor claw is removed on the semiautomatic
extractor to facilitate feeding. When everything is clean, reassemble by
inserting the extractor through the back of the bolt. Line up the long slot on
the back of the ejector with the arrow on the back of the bolt. Reinsert the
extractor retaining pin from the left side of the bolt. Using a small
screwdriver, try to push the extractor claw sideways. It should require firm
pressure but move freely. If there’s no tension on it, the extractor will have
to be removed again and bent slightly. If nothing else seems to help, replace
the extractor.
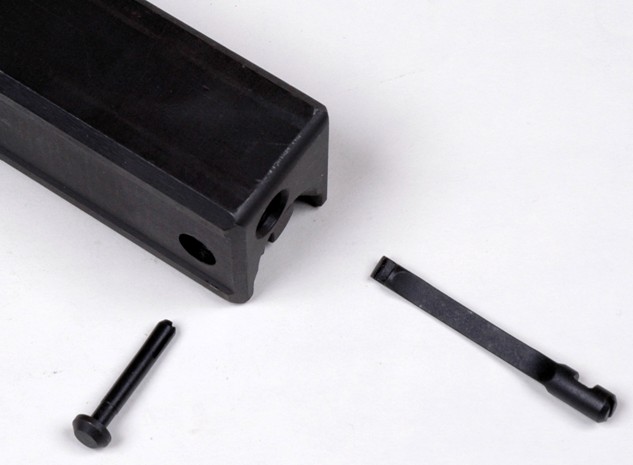 |
| To remove the extractor, push the extractor retaining pin out and then push the extractor out from the front side of the bolt. |
 |
| The semiautomatic extractor (left) has one corner of the claw removed. This ensures reliable feeding as the case rim slides up the bolt face. Cases do not slide up the bolt face on fully automatic bolts because the lower lip of the bolt lifts the case rim over the extractor. The rim snaps under the extractor as the bolt closes. |
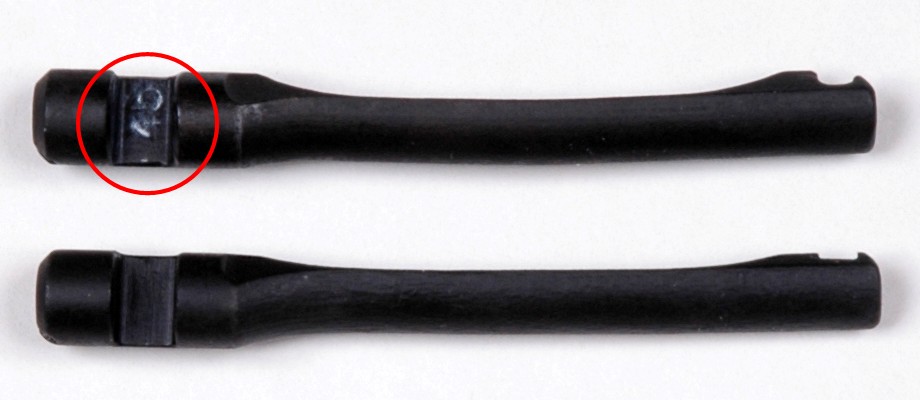 |
| The .45ACP extractor (top) is stamped “45”. 9mm extractors are unmarked. |
Failure to Feed
Failure to feed is the most difficult problem to diagnose
because there are many potential causes. A failure to feed occurs when the bolt
cannot forcefully strip the round from the magazine and push it into the barrel
chamber. The problems fall into three categories: bad recoil spring, excess
friction on the bolt, or misalignment of the gun’s components.
A weak recoil spring won’t impart enough energy on the bolt
for it to feed a round properly. Recoil springs can get weak with use and it’s
good to have a spare on hand, but it’s not a common problem. A more common cause
of a spring related failure is aftermarket springs that don’t meet factory
specs. Surplus IMI springs are cheap and plentiful so you should replace it at
any sign of problems. The entire spring and recoil rod assembly should be
replaced as a single piece.
A much more common cause of failure to feed is excess
friction on the bolt and that can come from several sources. The first thing to
check is the gap between the bolt and the top cover. Use a feeler gauge
(available at automotive shops) to measure the gap. It should be between .005
inches and .015 inches; preferable about .010 inches. If the gap is too small,
the top cover will need to be bent to give more clearance. You don’t need any
fancy equipment to bend a top cover; just a little patience and ordinary hand
tools. The easiest approach is to flip the top cover upside down and support
both ends with blocks of wood. Use a rubber mallet to hammer the middle of the
top cover to put a little bow in it. Do it slowly and re-measure the gap
frequently. If the gap is tight towards the front or back of the bolt, bend the
front or back of the top cover down. You can get by with a vise and a crescent
wrench to bend the ends of the top cover. Be sure the gap between the bolt and
top cover does not get excessively wide because it will allow the bolt to slide
past the sear without depressing the trigger. That would cause a “runaway”
condition and can be extremely dangerous.
 |
| Insert a .005 inch feeler gauge between the bolt and top cover. If it does not move freely, the cover will need to be bent to reduce friction on the bolt. A .015 incher feeler gauge should be tight to avoid a runaway condition. Check the gap with the gauge inserted straight in, pointed backwards, and pointed forwards. |
 |
| The long slot on the back of the extractor will be horizontal when properly reinserted in the back of the bolt. Fully automatic open bolts will have an arrow showing the proper alignment. |
If the top cover gap is okay, verify there are no other
sources of friction by using the bolt slide test. This test only works on open
bolt UZIs. Assemble the unloaded gun without the recoil spring, remove the
magazine, put the selector on full auto and hold down the grip safety. While
pulling the trigger, tip the gun forward then backward. You should hear the bolt
slide freely from the front to the back of the receiver. If it’s binding
anywhere you’ll need to find where it’s rubbing and correct the problem. One
common cause of binding is trying to use surplus machine gun bolts in a
converted semiautomatic UZI that still has a barrel restrictor ring. An IMI
machine gun bolt will not have enough clearance and will rub on the top of the
restrictor ring. If that’s the problem, the best solution is to have a qualified
gunsmith cut off the top of the restrictor ring, leaving just the machined feed
ramp.
If friction isn’t an issue, then the problem may be due to
misalignment of the gun’s components. First check the magazine. Bent or cracked
feed lips will cause misfeeds so the easiest test is to try different magazines.
The original 25 round IMI magazines are the most reliable for function tests.
Another magazine related problem occurs if it’s held too high in the
magazine-well. To test for this you’ll need to repeat the bolt slide test
mentioned above, but do it with a magazine body inserted in the gun. You must
remove the magazine spring and follower for the test to work. If the bolt rubs
on the feed lips during this test, you’ll need remove the magazine catch and
bend it so the magazine is held in a lower position. Check several magazines
before bending.
If the magazine alignment looks okay, the other potential
alignment problem is much more serious. When the barrel is not properly aligned
with the bolt, the round being fed into the chamber will not feed straight in,
resulting in a light primer strike or the round jamming between the bolt and
barrel. This type of alignment problem is most commonly found on guns built from
Group Industries receivers (original Group Industries or Vector guns) due to
those receivers being somewhat out of spec. Additionally, the heat treating done
by both Group Industries and Vector warp the receivers and they need to be
straightened before assembly, occasionally resulting in misalignment.
Straightening a misaligned receiver is not something you should attempt yourself
so if everything else checks out on your gun and you’re still experiencing
failures to feed, the best alternative is to contact Vector Arms for their
recommendation on factory repairs. Vector will do repair work on any brand of
UZI and their customer service is first rate.
Originally published in the
January, 2008 issue of Small Arms Review Magazine.
Copyright © 2002-2017, UZITalk.com
International copyright laws
DO apply to
Internet Web Sites!
All Rights Reserved.
Last Modified: May 27, 2017
Contact:
librarian@uzitalk.com