Closed Bolt Conversion
|
|
Closed Bolt Conversion |
By the late 1990's, both open and closed bolt versions of the full size UZI SMG were being imported into the United States for law enforcement use. However, full size closed bolts were still unavailable to people with transferable UZIs. As a result, bolt conversions were sought after to give people the closed bolt experience in their full size UZI SMG.
Just like in the Mini UZI closed bolts, the full auto closed bolt on the full size UZI is very similar to a semi auto bolt, but a semi bolt cannot be used for full auto fire. The absence of a lower lip on the semi bolt face allows the exposed firing pin to contact the rim of a case during feeding, causing it to jam. Even though the full auto closed bolt looks very similar to a semi auto closed bolt, a conversion usually begins with a full auto OPEN bolt. This results in two advantages: (1) the open bolt does not have a slot cut in the side. Creating a full auto bolt with a slot in the side would be manufacturing an illegal machine gun. And (2), the open bolt is fully supported - having a raised lip on the bottom edge of the bolt face. Following are photos comparing an original open with a full auto closed bolt converted by D&D Sales.
Comparison of the bolt face between the open and closed bolts. The raised lower lip and full auto extractor are maintained from the open bolt. A hole is drilled through the converted bolt permitting a carrier mounted firing pin rather than the fixed firing pin on the face of the open bolt. |
 |
This bottom rails of the bolt need to be
modified during the conversion. Notice that the front rails have been
extended on the closed bolt (refer to red circles). This modification is
necessary to keep the sear from holding the closed bolt open. The red
straight lines show where the rails had been removed. The large cut on the
left side of the bolt (right side of photo) make room for the striker
assembly. The shorter cut on the right side of the bolt (left side of photo)
allows the sear to pop up so it can catch the striker.
|
 |
The right side of the bolts show how the closed bolt ejection port was enlarged. Because of the shorter stroke of the closed bolt, the enlarged ejection port ensures that the ejected case will clear the bolt as it moves forward. The red line shows where a portion of the rail had been removed (allowing the sear to pop up and catch the striker on the other side) and the red circle shows where the rail had been extended. |
 |
The left side of the bolt again shows where the rail was removed to make room for the carrier (red line) and the front of the rail is built up (red circle) so the bolt is not held open by the sear. |
 |
The rear of the bolt shows the hole that was drilled to allow the floating firing pin to be inserted. The striker assembly butts up to the two small raised pins to ensure proper firing pin protrusion. |
 |
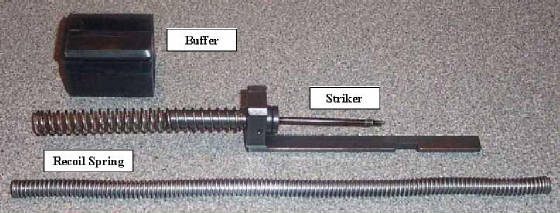
The buffer and striker assembly are standard semi automatic parts. The recoil spring is a full auto version without the thin, hard buffer. A shorter semi auto recoil spring will not work with the full auto closed bolt conversion. |
 |
Three different views of the completed closed bolt assembly. When the striker is “charged” or “cocked,” the front of the rail of the striker (see inside of red circle) makes contact with one side of the sear only. When the charging handle is released, the bolt will move forward and strip a round from the magazine and chamber it. At that point, the striker is held to the rear by the sear and the bolt is forward with a cartridge in the chamber. This is why it is called a “closed bolt.” When the trigger is pulled, the sear is retracted allowing the striker assembly to move forward and the primer is ignited by the firing pin. When the selector is in full auto mode, the striker will “ride” with the bolt as long as the trigger is depressed. This causes the firing pin to protrude from the bolt face like the fixed firing pin of the open bolt. When the trigger is released, the sear engages the striker and holds it to the rear while the bolt moves forward and chambers a cartridge. |
 |
The full auto sear does not
need to be modified for this conversion to work, but the closed bolt conversion
will not work with the ratchet mechanism installed in the top cover because the
bolt cannot be retracted far enough to disengage the ratchet pawl. To use the
converted closed bolt, you either need to remove the ratchet pawl or use a semi
auto top cover. With this configuration, care needs to be taken to ensure that
the bolt/striker assembly has been completely pulled to the rear when cocking
the gun. If it’s not and you release the charging handle without allowing the
striker to be engaged by the sear, the gun may discharge.
The closed bolt conversion results in an extremely fast rate of fire -- at least
double the cyclic rate of the standard open bolt assembly. The ROF is much
higher due to the limited travel of the closed bolt as compared to the open bolt
(the open bolts travels farther into the rear of the receiver). There are two
factors reducing the bolt travel: (1) the additional length of the closed bolt
buffer (buffer is 1 and 3/4 inches long), and (2) the rear portion of the
striker assembly, that protrudes from the back of the closed bolt, adds at least
another 1/2 inch. Taking both of these factors into account, the closed bolt has
about two inches less travel than the open bolt version. This decreased bolt
travel is what dramatically increases the cyclic rate. A properly converted
closed bolt should be every bit as reliable as the open bolt.
Copyright © 2003-2017, UZITalk.com
International copyright laws
DO apply to
Internet Web Sites!
All Rights Reserved.
Last Modified: May 7, 2017
Contact:
librarian@uzitalk.com