 |
Installing a Bolt Safety |
A bolt safety is an optional safety that can be installed
in an open bolt UZI and can, under certain circumstances, help prevent
accidental discharges. Installing a bolt safety requires modifications to both
the grip frame and the receiver.
|
If you're not VERY mechanically inclined and
don't have a good selection of tools and aren't very steady handed with a
Dremel, then you should have someone else do this. Screwing up your RR Vector
UZI would be a shame unparalleled by any other screw up you've accomplished
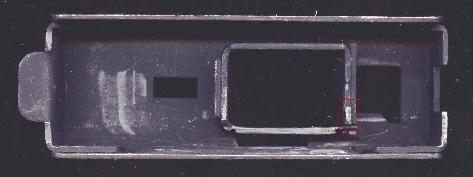
lately. Here's a picture of an unmodified lower.
The area in red is where you'll need to take
away some metal to allow the bolt safety to be installed. It is ~1.5" long
and will be cut anywhere from .200" - .280" deep depending on which end you
measure from. I say that because on many lowers, the rear section has a
raised "bump" and the front doesn't. So to start, cut .200" deep and then
hand fit the safety by cutting deeper as needed. DO NOT CUT THE SAFETY! |
 |
|
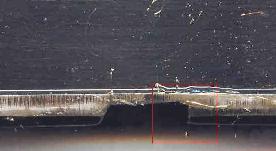
This is basically what it should look like
after making the cut. This is the first lower I did and is of course an FA
lower. The area area in red is what I referred to as "raised". |
 |
|
For comparison, this is a factory lower with
the modification already done by IMI. |
 |
|
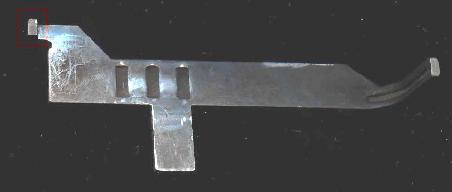
This is the bolt safety itself. It's the only
"additional" part required for this modification. |
 |
|
This is the selector. It's different from both
the SA selector and the standard FA selector. Neither of those selectors can
be used. The area highlighted here is
the main reason that this selector must be used. If not for that little nub,
the other selectors could be used. This little nub is also an area that will
require a little fitting to ensure smooth operation. When the selector and
safety is installed, the nub should stick out far enough to engage the
safety across its full width (maybe .1") but no further. |
 |
|
Here's the lower with the selector installed.
The trigger must be installed for this setup to work since the bolt safety
installs on the same pin as the trigger mechanism. Also, the trigger
mechanism spring is what applies the upward tension on the safety and causes
it to pop up when engaged. |
 |
|
Here it is with the addition of the bolt
safety. You can see where the safety and the selector engage each other and
how a little polishing to the parts is required to make for smooth
operation. The corner of the safety must be both round and smooth. You also
want the safety to stick up as much as possible so it will engage the bolt
with more surface area and provide a more positive lockup. This can be
helped by removing some of the metal from the bottom of the "nub" on the
selector and polishing it as well. Also by removing a little metal from the
top of the safety where it engages the selector. It also helps if you make
the notch in the bolt, where the safety engages it, more perpendicular. |
 |
|
This is what it should look like if you choose
to make the notch "perpendicular". |
 |
|
And last but most certainly not least, you will
need to cut a small notch in the receiver on the edge of the magazine well
to allow the safety into the receiver and make contact with the bolt. The
notch will end up being ~.100" wide and ~1" long. I just put the lower on
the receiver and eyeballed it. |
 |
Return to the UZI Talk Index
Copyright © 2003-2017, UZITalk.com
International copyright laws
DO apply to
Internet Web Sites!
All Rights Reserved.
Last Modified: May 27, 2017
Contact:
librarian@uzitalk.com